
How to Create Dynamic Timelines Using Just Notion
Create dynamic Notion timelines with native formulas and rollup. A clean way to manage projects with task dependancies all within Notion.


Notion timelines don’t link dates together by default. You can now set dependencies, but that doesn’t update the date when the parent changes. This is where my Automated Notion Timelines template comes in. It handles the problem with a few formulas and a rollup, making it easy to see the dates of tasks by linking to the parent task. And best of all, it’s free!
The stakes are high when it comes to managing a complex project. If you don't keep it updated, you risk the project failing simply because it’s a hassle to keep everything up to date. Not keeping everything updated means you can’t focus on the important parts of the project, and others involved can’t easily see what they’re doing and when.
Now you can manage that large project with ease. Impress your boss by keeping everything up to date with a single update to the timeline. Just follow the link to my Gumroad and place your order.
With my Automated Notion Timelines template, you’ll be transformed from a project management novice to a pro. Say goodbye to the stress of managing a large project and hello to a more efficient workflow.
Free onSales pitch aside (written by an AI I might add), here’s how I built the Automated Notion Timelines feature.
The fundamentals of the Gantt Chart are based on a couple of key points.
- The thing you’re going to work on - The task itself almost goes without saying
- When you’re going to start
- How long it will take - Usually an approximation to begin with as this is what’s likely to change and the project progresses
- What needs to happen before - The linking of tasks gives you that sequential flow of what needs doing and when.
Of course, there are other elements that can be added into the Gantt Chart and those can be added as additional properties. “Who is doing the task” would be an example to add in.
The first 3 properties
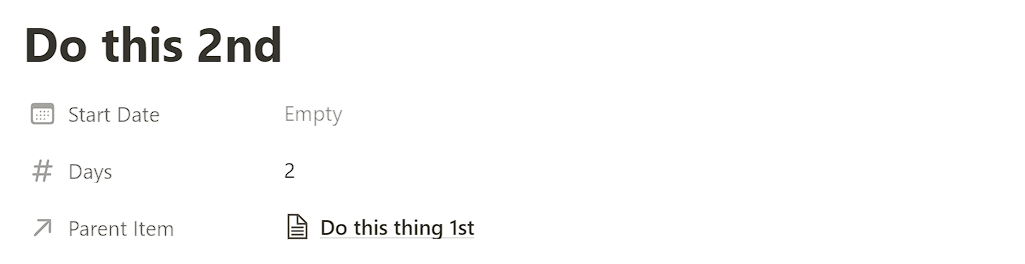
First, I set up the Start Date. This is a simple date property that you fill in with the exact date (and time if you like) of when you’re going to start the task.
Next is the Days property. For this, I simply went with a number property because that’s all that’s needed. Days can be changed to some other unit of time, but you’d need to update the formulas to match too. At least for now.
The third property is a relation back to the same database. This gives you the parent/child relationship between the tasks and links them together. Note that it’s possible and also quite likely in a large project that you might have multiple child tasks that are dependant on the parent.
Rollup and have fun with formulas
Now the fun part. How to get the data in the format needed for the timeline view to work. Four properties are required for this to work. Three are formulas and one is a rollup. I think the best way to think about this is to start somewhere in the middle. By that I mean we’ve already got a couple of tasks and now we need to link them together.
Task 1 has a start date that’s been defined and you know roughly how long it will take.

Lets say you start this on the 19th January and the task will take 3 days to complete.
Task 2 needs to be linked to the first. This is done with the relation and is a normal parent/child setup. We don’t want to define a static start date because this task can only be started when the first one is finished, so we leave Start Date blank. We also have a rough idea that Task 2 will take say 2 days to do, so we can set the Days to 2. Easy.
This next part involves some backwards thinking. Since we know that Task 2 is linked to Task 1, we need to make the end date of Task 1 visible to Task 2 so that it can be used as the start date for Task 2. The formula I used to get the Timeline End Date checks for a Parent Item. If there isn’t one, then return the Start Date with the number of days from the Days property added using the dateAdd function.
if(empty(prop("Parent Item")),
    dateAdd(prop("Start Date"), prop("Days"), "days")
  , dateAdd(fromTimestamp(toNumber(slice(prop("Parent Item Dates"), 14))), prop("Days"), "days"))
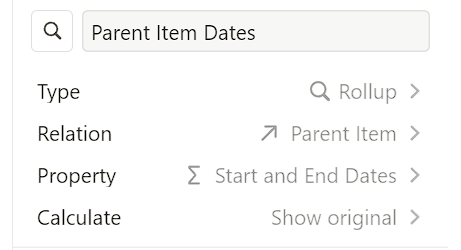
If there is a Parent Item, then we need to use the result of the rollup called Parent Item Dates. The Timeline End Date property returns a nicely formatted Date-type property which we’ll use later in the Timeline view.
The rollup returns two timestamp dates which come from another formula property called Start and End Dates.
Since we only want the end date from the rollup, we need to slice the rollup in two using another formula type property and take the digits from the 14th character onwards (the “1” after the comma) - Note that the slice function starts counting from 0 and is inclusive. We then convert it to a number so that it can be used as a proper timestamp later.
if(empty(prop("Parent Item")),
    join(",", format(toNumber(prop("Start Date"))),
              format(toNumber(prop("Timeline End Date"))))
  , join(",", slice(prop("Parent Item Dates"), 14),
              format(toNumber(prop("Timeline End Date")))))
This is saying: If there is no Parent Item ie. the task is not dependant on anything else, then return the Start Date and Timeline End Date as a comma separated string.
If there is a Parent Item, get the end date of the parent item coming from the rollup - remember we want everything from the 14th character onwards. This end date becomes the start date of the child item. Then we also want to return the Timeline End Date which we calculated earlier based on the number of days it’ll take to do the task.
Quick brain break…
As I’m writing this out and trying to explain my work, I’m getting myself lost in the circular nature of the method, but bear with me for what comes is a really clean result that can be implemented into any tasks database.
Going back to the start of the timeline
By this point we now have a working method of getting the dynamic start and end dates for tasks that are linked together. But, in order to make the Timeline view work and also be dynamic, we need to have a another property returning a date format that Notion can use. The Timeline Start Date is the final formula that gets the timestamp from other Start and End Dates formula property. We again use slice here to get the first 13 digits of the timestamp.
fromTimestamp(toNumber(slice(prop("Start and End Dates"), 0, 13)))
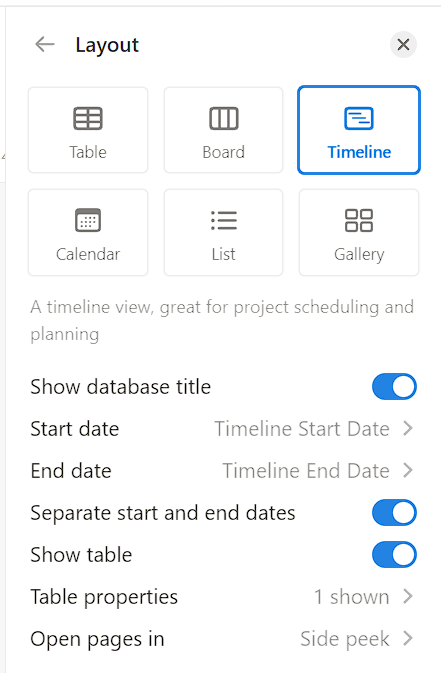
Now that we have all that out of the way, we can add our tasks, set the start date of the first item and then just worry about how long each task that follows it will take. We can put this into the Timeline view to see it properly in action. In the Timeline view, simply set the Start Date and End Date of the Timeline view with the separated Timeline Start Date and Timeline End Date respectively.
And that’s it! You might be wondering “Great, but how can I use this myself?”. I’ve tried to make this as clean as possible so that it can be added to an existing database of tasks that have dependancies. Simply copy the relation (if you don’t already have a parent/child relation set up), the formulas, and the rollup into your existing database and you should be good to go. If you need any help, I’m happy help in any way that I can.
Some example projects that might use this kind of timeline:
- A large software development project that has lots of features working together.
- A DIY project like decorating a kitchen where certain things need installing or doing in a particular order.
- Planning an event with a lot of different people need to do their work only after something else has been done.
This Notion template is completely free to duplicate and use as you like. I’d really appreciate a follow on twitter and if you would like to support me further, feel free to contribute a sum of your choice via a Gumroad purchase.
There are a few additions I can make this this template which I’ll do doing as soon as I can, so get subscribed if you want to hear about that and more from me.